WS-FTP - Windows FTP Client
|
More information about Real Time's products & services is available on our sales web site. Direct links for each item are listed below:

|
WS-FTP is a commercial FTP client used on the Windows OS.
Table of Contents:
Homepage
The homepage for WS-FTP is http://www.ipswitch.com/Products/file-transfer.html
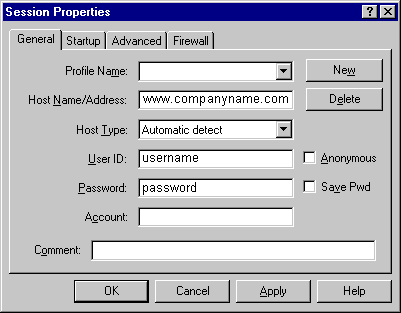
Initiate a Connection
When you start WS-FTP a dialog box automatically opens to create a connection. Use the mouse or the
tab key to move among fields.

- Refer to the Welcome Letter that was faxed to you for the following:
- In the Host Name/Address: field enter the Main URL for your website
- In the User ID: field, enter your Account name
- In the Password field, enter password (note: If you have checked Anonymous Login,
WS-FTP displays the address as typed. If you have not checked this option, a series of asterisks displays.
- Click OK
- A connection with the ftp server is established and the session window opens.
File Transfer with WS-FTP
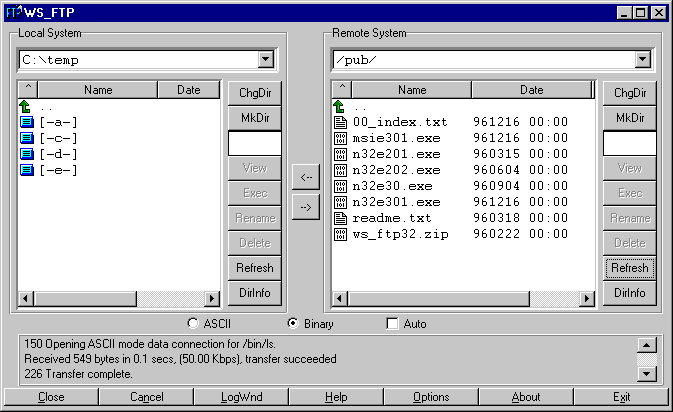
Once connected, the WS-FTP window contains information about the local and remote computers. Files
and directories on your local computer appear in the left hand box. Files and directories on the remote
computer appear in the right hand box. To navigate among directories, double-click on a directory name.
To move up a level in the directory structure, double-click on the two dots(..). The current directory
appears at the top of the screen.

Upload Content
- Click once on a file name in the left hand box
(note: Unix treats filenames somewhat differently than other programs. It is useful to remove spaces,
capitalization and extensions from filenames before uploading them)
- Click on the circle next to ASCII if it is a text file, or next to Binary if it is a
binary file. If your not sure what to use, select Auto
- Choose a directory on the remote computer (right-hand panel) to which you want to upload the file.
Note: All viewable web content (html files, images, etc.) should go in the /html directory.
- Click on the right arrow button.
Download Content
- Click once on a file name in the right hand box
- Click on the circle next to ASCII if it is a text file, or next to Binary if it is a
binary file. If your not sure what to use, select Auto
- Choose a directory on your computer (local system in the left-hand panel) to which you want to download
the file.
- Click on the left arrow button.
Close a Connection
- Click on the Close button in the lower left corner
The instructions and screen shots contained within this website are specific to services offered by Real Time Enterprises only.
If you have any problems connecting to Real Time after carefully following these directions, please call (952) 943-8700 and we will
be happy to help you.
Permission is granted to copy, distribute and/or modify this
document under the terms of the GNU Free Documentation License,
Version 1.1 or any later version published by the Free Software
Foundation; with no Invariant Sections, no Front-Cover Texts and
no Back-Cover Texts. A copy of the license is included in the
section entitled "GNU Free Documentation License".
|
|


