Windows 95 VPN Configuration
|
More information about Real Time's products & services is available on our sales web site. Direct links for each item are listed below:

|
NOTE: The following instructions are for connecting to a Real Time Linux Firewall with VPN services only, if you are trying to connect to any other server, these instructions will not help you.
Take a look at Real Time's Firewall and VPN information to learn more about our Linux Solutions.
Table of Contents:
Requirements:
-
VPN User Information Sheet
-
Dial-Up Networking 1.2 or higher - this can be obtained from:
http://www.real-time.com/downloads/win95/msdun13.exe
-
128-bit encryption patch
For Windows 95: http://www.real-time.com/downloads/win95/w95_DUN13_128.exe
Note: when downloading these files you will be asked where to save it. We recommend saving it in C:\Temp.
Depending on the web browser you are using, when the file is done downloading the browser my run the .exe
file automatically. If it doesn't, go to C:\Temp to run the .exe file.
-
Internet Connection (you will need to be connected to the Internet before establishing your VPN connection)
Installing Dial-Up Networking
(Skip to Configuring PPTP Connection If you already have Dial-Up Networking 1.3 or higher already
installed)
-
Double-click msdun13.exe to begin installation of Dial-Up Networking 1.3
-
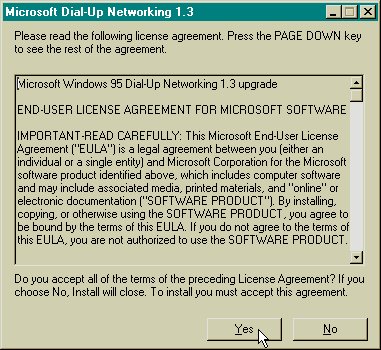
Click Yes to continue

-
Click Yes to continue
-
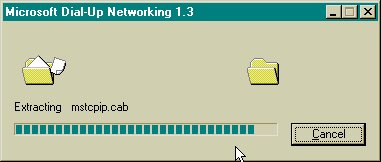
You should see the Microsoft Dial-UP Networking 1.3 screen as the files are being installed
-
Click Yes to restart your computer

-
To make sure your installation was successful, go to Start->Settings->Control Panel->Network.
You should see Dial-up Adapter (VPN Support) and a Microsoft Virtual Private Networking Adapter
Configuring PPTP Connection
-
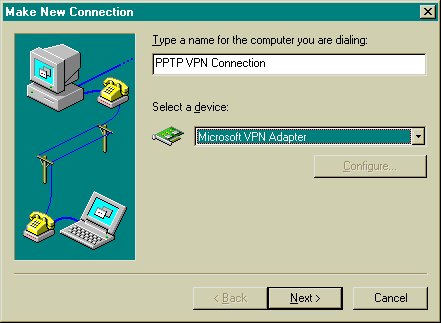
Double-click on My Computer and double-click the Dial-Up Networking folder.
Double-click Make New Connection. (Note, if you do not see a Dial-Up Networking icon here, then
Dial-Up Networking is not installed. Refer to the instructions for installing Dial-Up Networking.)

-
Type in PPTP VPN Connection for the name of the connection. For the device, select Microsoft
VPN Adapter. (Note: if you do not see Microsoft VPN Adapter in the list, then the correct version
of Dial-Up Networking is not installed. Refer to Installing Dial-Up Networking.
-
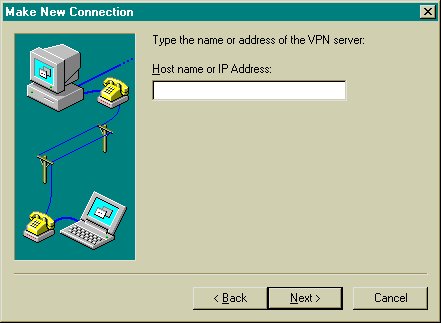
Fill in the Name or IP address of the VPN or PPTP server you are connecting to. You will
find this on your VPN Information Sheet. Click Next.
-
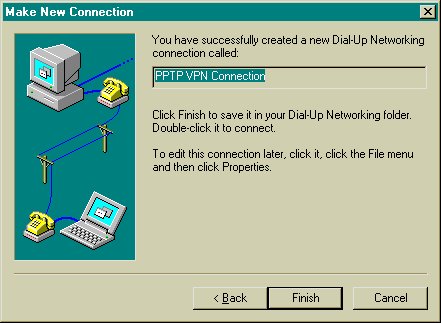
Click Finish
-
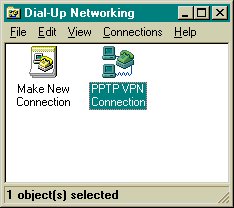
Now you should see the connection you just made in the Dial-Up Networking Folder. Right-click
the connection and select Properties.
-
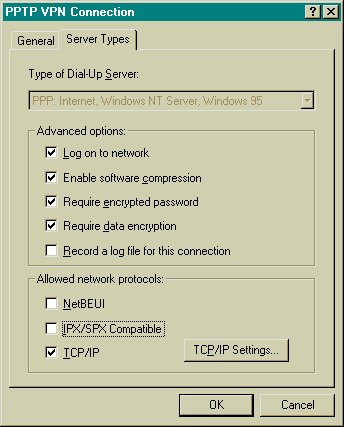
Select the Server Types tab and check the following options: Log on to network,
Enable software compression, Require encrypted password and Require data encryption.
Also, place a check next to TCP/IP. Now click the TCP/IP Settings button.
-
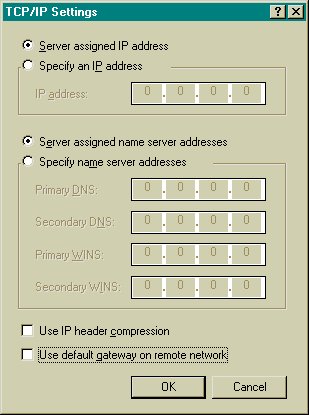
Check Server assigned IP address and Server assigned name server addresses. Click
OK.
Connecting
You must be connected to the Internet before trying to establish your PPTP VPN Connection. If you
are not, the VPN connection will not work.
-
Double-click the PPTP VPN Connection icon you just made above. You should see the Dial-Up
Networking screen.
-
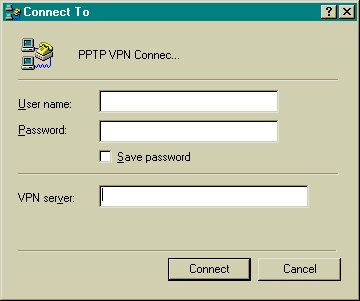
Enter in your Username and Password - this should be your VPN username and password,
which you should get from your VPN Information Sheet. The VPN Server should be filled in from when
you setup the connection - verify that it's correct. You can choose to check the Save Password box if
you wish. Click Connect.
-
You should see the Connecting to PPTP VPN Connection screen.

-
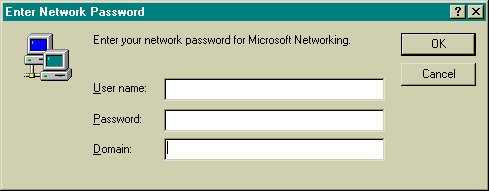
Fill in your Username, Password, and Domain for the network you are connecting
too. These should be the same as you use when you're in the office. If you don't know what to fill in,
refer to your system administrator.
-
After you successfully connect, you will see the Connection Established screen. Click Close.
Now you should be able to browse the network as if you were at the office. If you use mapped or shared
drives, you may need to map them again.

VPN for Windows should now be successfully setup on your computer to securely access a remote network.
If you still have problems connecting to Real Time after
carefully following these directions, please call (952) 943-8700
and we will be happy to help you.
The instructions and screen shots contained within this website are specific to services offered by Real Time Enterprises only.
If you have any problems connecting to Real Time after carefully following these directions, please call (952) 943-8700 and we will
be happy to help you.
Permission is granted to copy, distribute and/or modify this
document under the terms of the GNU Free Documentation License,
Version 1.1 or any later version published by the Free Software
Foundation; with no Invariant Sections, no Front-Cover Texts and
no Back-Cover Texts. A copy of the license is included in the
section entitled "GNU Free Documentation License".
|
|
